Jumping into video editing can feel like trying to pilot a spaceship with an instruction manual written in Klingon. With endless software options, confusing jargon, and a million different techniques, it's easy to get overwhelmed and just give up. But what if you could skip the frustration and learn the core skills that separate amateur clips from professional, engaging content? This guide is designed to do just that.
We're cutting through the noise to bring you 10 powerful video editing tips for beginners that will elevate your projects instantly. Whether you're creating for YouTube, TikTok, or your first short film, these actionable techniques are your new secret weapon. Mastering them will not only make your content look better but will also streamline your workflow, saving you hours of headaches. To truly transform your clips and stay competitive, it's wise to stay informed about the latest editing tools and techniques.
For content creators looking to stay ahead, mastering these skills is just the first step. To ensure your perfectly edited videos reach the right audience, an intelligent content strategist is key. The Trendy app analyzes your niche and audience to provide personalized post ideas and trend suggestions, turning your newfound editing skills into measurable growth. Ready to transform your timeline? Let's dive in.
Ready to make your edits feel less like a clumsy school project and more like a slick Hollywood production? The secret sauce isn't some expensive plugin; it's a classic trick called the J-cut and L-cut. This is one of the most fundamental video editing tips for beginners that will immediately elevate your content. These cuts are named for how they look in your editing timeline. A J-cut is when the audio from the next clip starts before the video cuts to it. Conversely, an L-cut is when the video from the next clip appears while the audio from the previous clip continues to play.
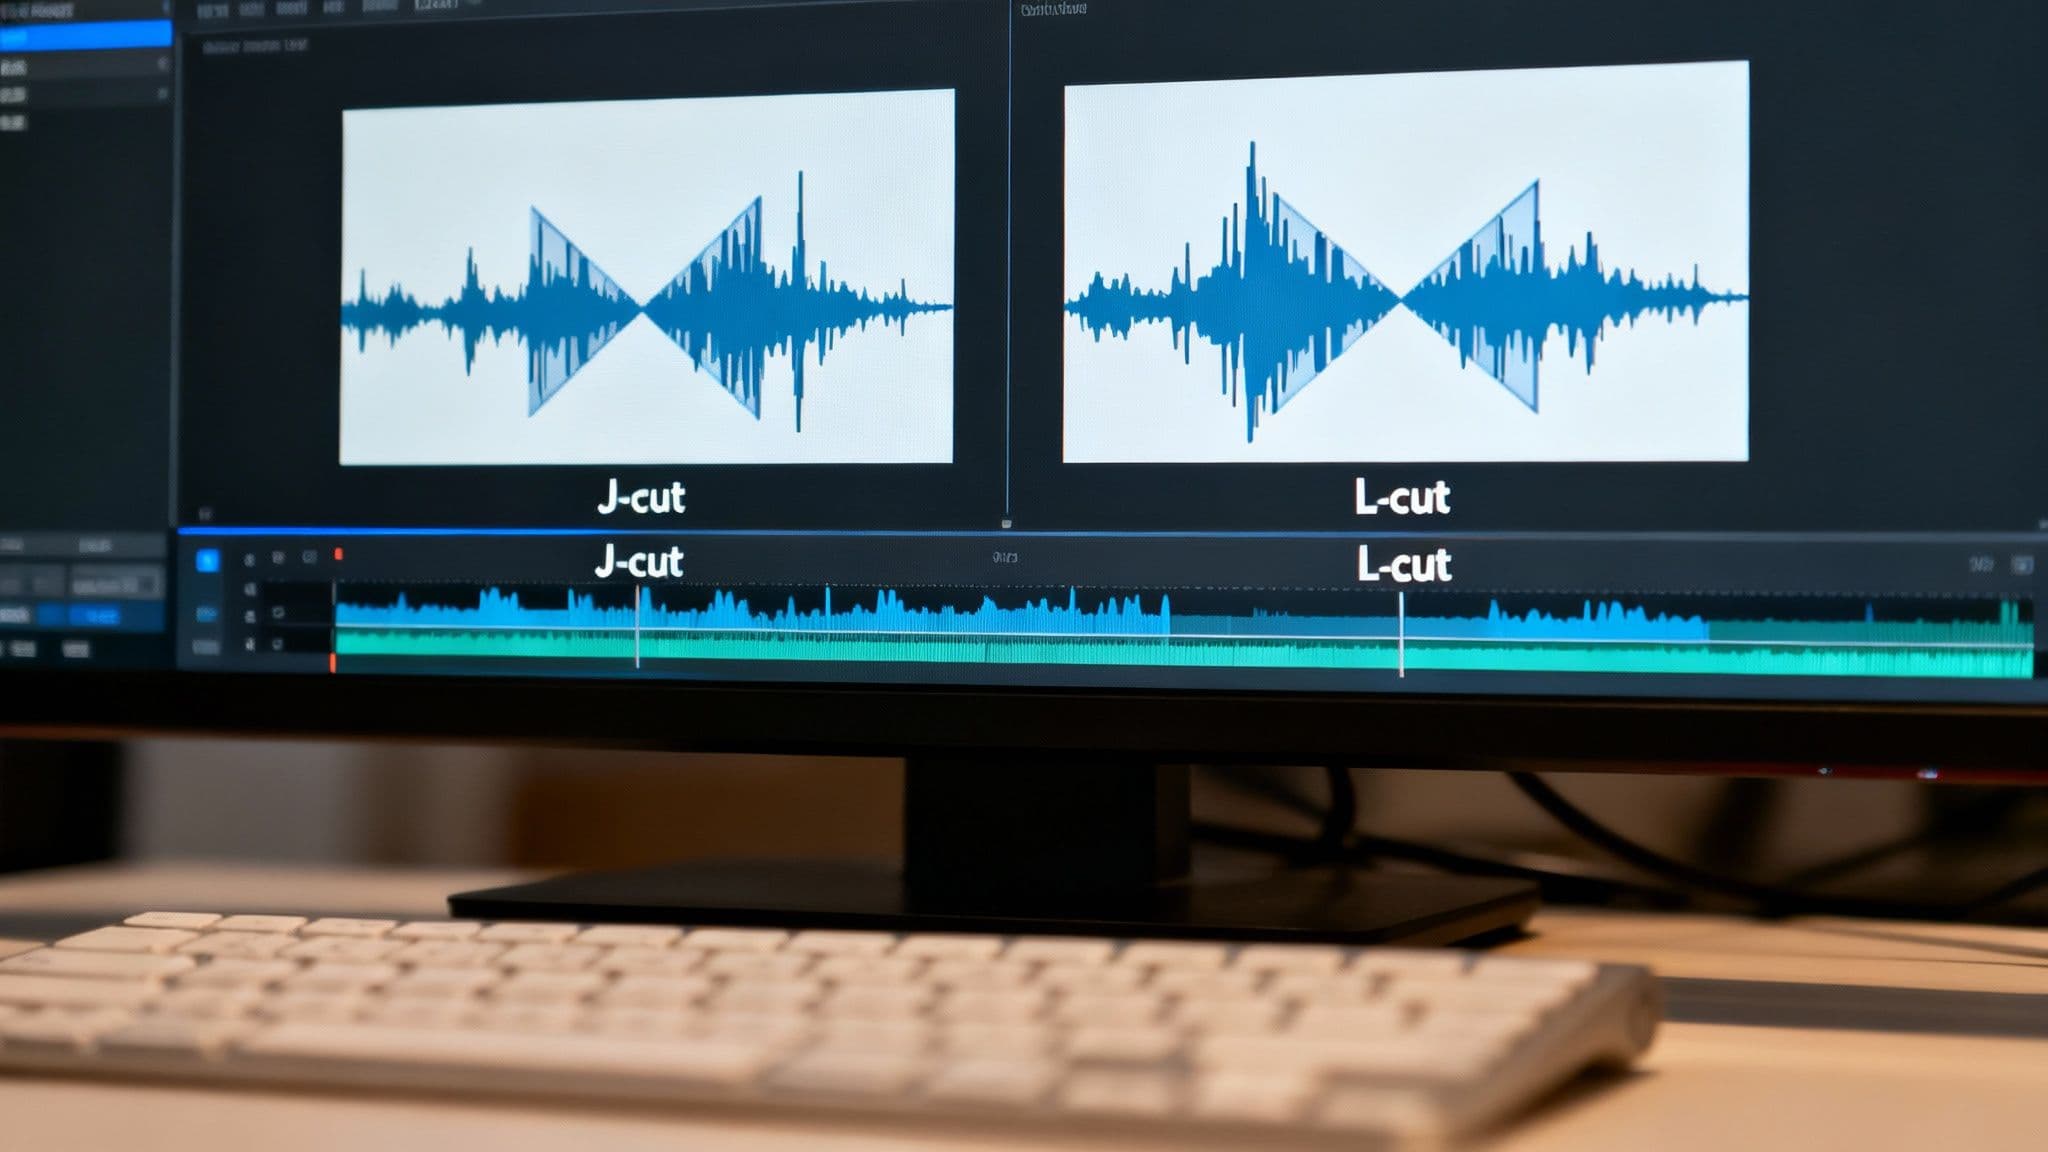
This technique makes transitions feel seamless and natural, guiding your audience's attention without jarring "hard cuts." Think of a YouTube interview where you hear the host’s next question (a J-cut) just before you see their face, or seeing a creator’s reaction (an L-cut) while their friend is still finishing a sentence.
Here's how to master it:
Ever wonder why your footage looks flat and lifeless while your favorite creator’s videos pop with cinematic flair? The magic isn't just a fancy camera; it's color grading and correction. This is one of the most impactful video editing tips for beginners because it transforms the entire mood of your content. Color correction is the technical step of fixing problems like white balance and exposure to create a neutral, true-to-life base. Color grading is the fun part: applying a creative style to evoke an emotion, like the warm, inviting tones of an influencer’s travel vlog or the dark, moody aesthetic in a music video.
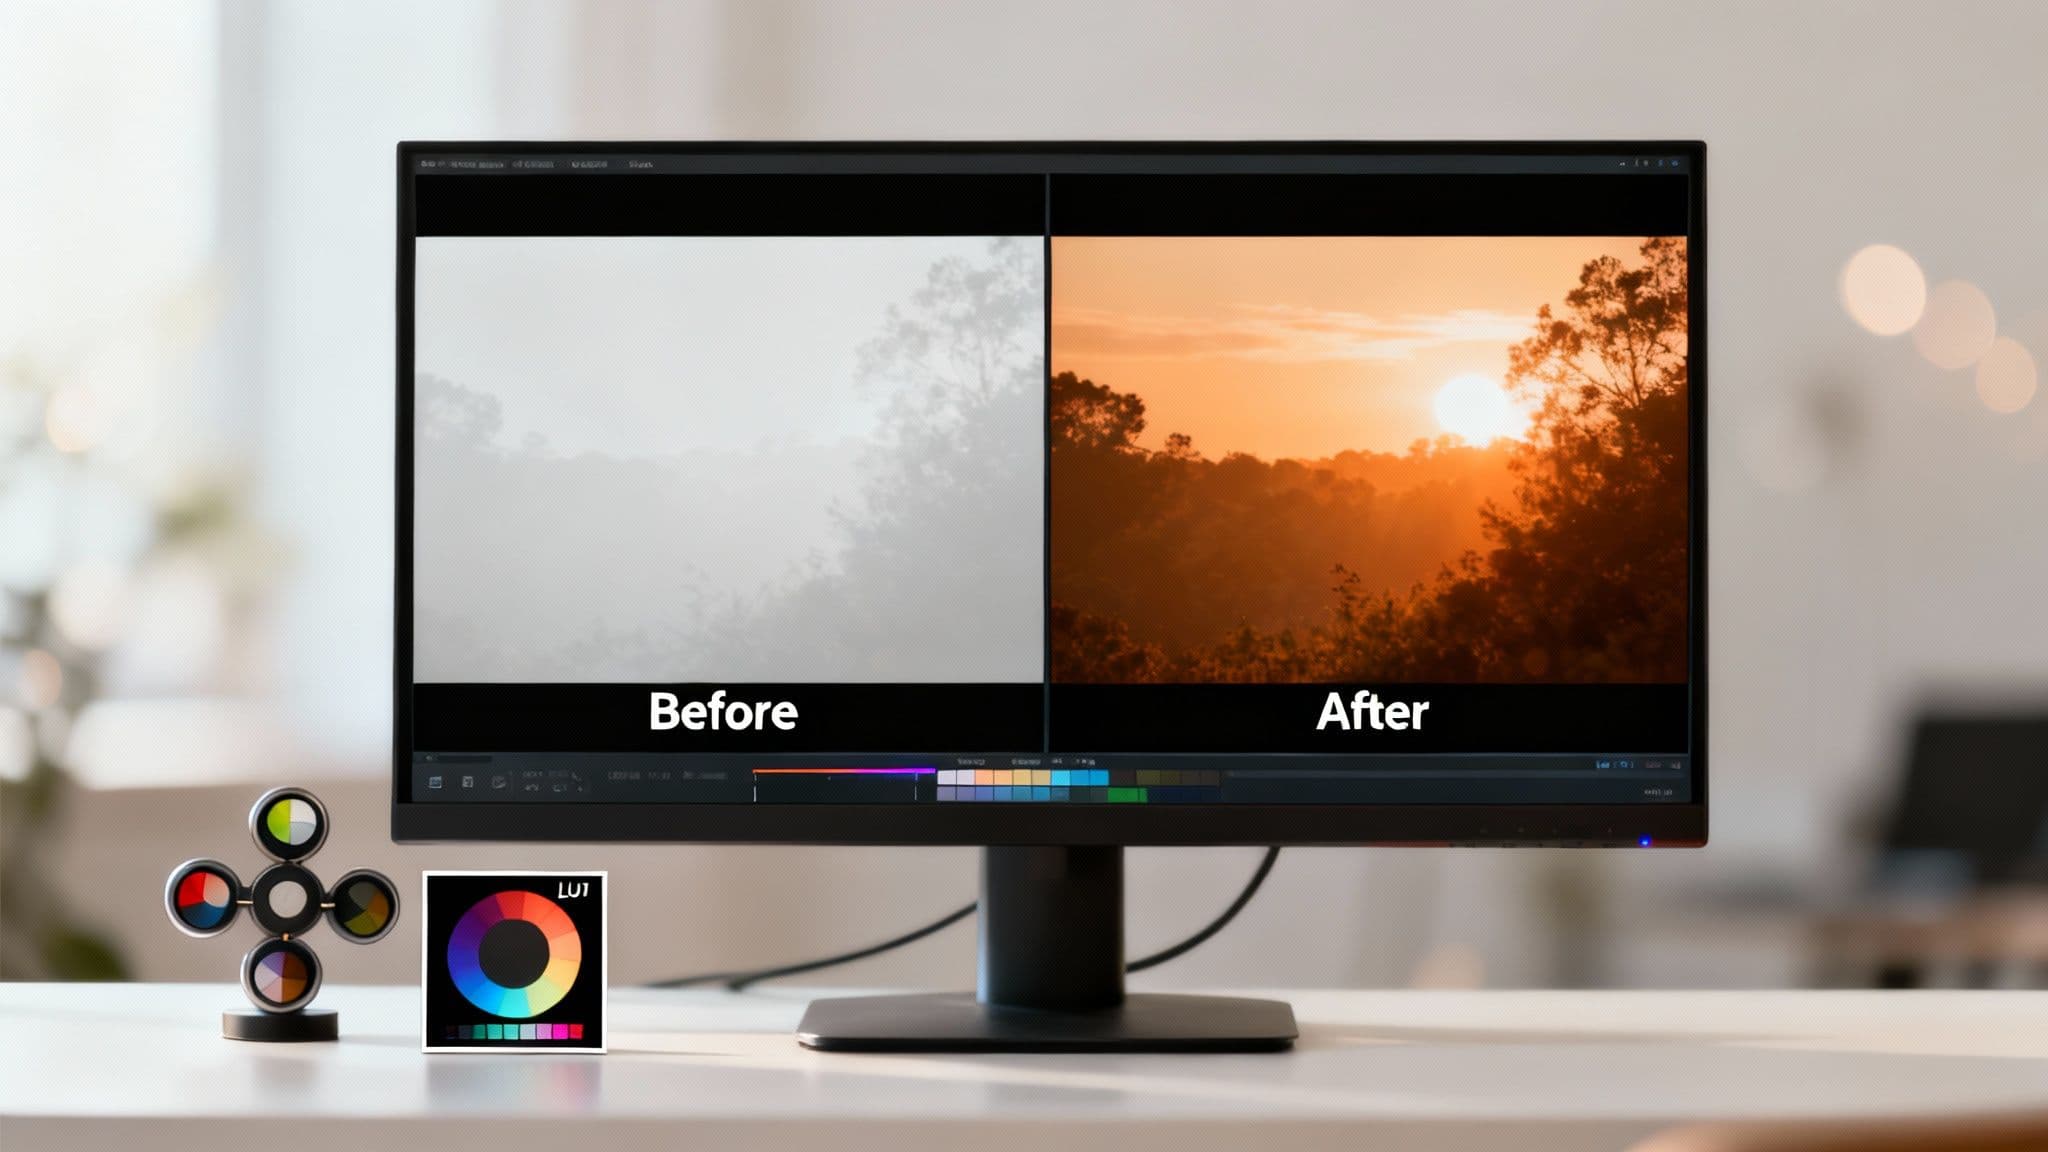
Proper color work makes your videos look professional and builds a cohesive brand identity. It’s the difference between an amateur upload and a polished piece of content that hooks viewers. By controlling the color, you control the story’s emotional tone.
Here’s how to master it:
Ever wonder how YouTubers seamlessly switch between a wide shot and a close-up during a podcast or interview? The magic isn't in painstakingly lining up clips; it's a powerful technique called the multi-cam editing workflow. This is one of the most game-changing video editing tips for beginners filming with more than one camera. Multi-cam editing allows you to synchronize footage from multiple angles and switch between them in real-time, as if you were a live TV director.
This workflow transforms a static video into a dynamic, engaging experience, holding your audience's attention for longer. It's perfect for interviews, product unboxings, live event coverage, or any content where multiple perspectives add value. Instead of guessing which angle is best, you can choose the perfect shot on the fly.
Here's how to master it:
Want to edit faster than a caffeinated squirrel on a deadline? Stop dragging your mouse around for every single action. Learning to use keyboard shortcuts, or "hotkeys," is the single biggest leap you can take from fumbling beginner to efficient pro. This is one of those video editing tips for beginners that seems tedious at first but pays off massively, turning hours of clicking into minutes of fluid keystrokes. Instead of navigating menus, you’ll be making cuts, adding effects, and moving clips with the press of a button.
This technique rewires your muscle memory for speed and precision, letting your creative ideas flow directly onto the timeline without interruption. Professional editors who cut 40-minute episodes weekly don't hunt for the "razor tool" icon; they just press 'C' in Premiere Pro. It’s about building a direct line from your brain to the software.
Here's how to master it:
Ever watched a movie scene where two people are talking, and suddenly they seem to have swapped places for no reason? It's jarring, confusing, and instantly pulls you out of the story. This common beginner mistake is easily solved by understanding the 180-Degree Rule, a core principle that keeps your videos looking professional and easy to follow. Think of it as the invisible director's chair that ensures your audience always knows where they are.
The rule works by drawing an imaginary line between your subjects. As long as you keep all your camera angles on one side of that line, the characters will maintain the same left/right relationship with each other, creating seamless spatial continuity. A classic example is any dialogue scene in a sitcom; the characters always appear on the same side of the screen when cutting between them. This is one of the most vital video editing tips for beginners to master for clear storytelling.
Here's how to master it:
Ever opened a project folder and felt like you were staring into a digital abyss of chaos? This is where a little organization saves your sanity and your project. A systematic workflow using nested bins (folders in your editing software) is one of the most crucial video editing tips for beginners. It’s the difference between a smooth, professional process and a frustrating, time-wasting mess. This technique involves creating a hierarchical folder structure inside your editing software to neatly sort all your media.
A clean project structure means you spend less time searching for clips and more time creating. Think of it like a chef's kitchen where every ingredient has its place. This is standard practice for professional production companies and YouTube pros like Peter McKinnon for a reason: it's efficient and scalable, especially for complex projects or team collaborations.
Here's how to master it:
Date_Project_Scene01_Take03. It seems tedious at first but is a lifesaver later on.Tired of getting lost in a sea of clips and endlessly tweaking the same five-second segment? The solution isn't more caffeine; it's a structured workflow used by professional editors everywhere. The rough cut to fine cut process is a game-changing video editing tip for beginners that breaks down editing into manageable stages, saving you from creative paralysis and ensuring a polished final product. It’s all about building your video layer by layer, from a messy first draft to a masterpiece.
This methodical approach forces you to focus on the big picture (story and pacing) before getting bogged down in the tiny details like color correction or fancy effects. Think of it like building a house: you lay the foundation and frame the walls before you start picking out paint colors. This workflow is standard in everything from Hollywood films to high-performing social media content.
Here's how to master it:
Ever wonder why an action scene gets your heart racing or a sad moment makes you pause and reflect? It’s not just the music; it’s the editor playing with time itself. Mastering pacing by adjusting your clip length and the rhythm of your cuts is one of the most powerful video editing tips for beginners to control the viewer's emotional journey. Short, rapid cuts create energy and excitement, while longer, lingering shots allow for contemplation and emotional absorption.
Pacing is the heartbeat of your video. A consistent, monotonous rhythm can bore your audience, while a dynamic, intentional rhythm keeps them hooked. Think of a MrBeast video with its lightning-fast cuts to maintain high energy, versus a documentary that holds on a single shot to let a powerful interview sink in. This intentional manipulation of time is what separates amateur edits from professional storytelling.
Here's how to master it:
You can have the most stunning 4K footage in the world, but if your audio is a crackly, muffled mess, viewers will click away instantly. Great sound isn't just a bonus; it's half the viewing experience. This is one of those video editing tips for beginners that separates amateur content from polished, professional work. Mastering the basics of audio editing means cleaning up dialogue, balancing levels, and adding sound effects to make your videos feel immersive and high-quality.
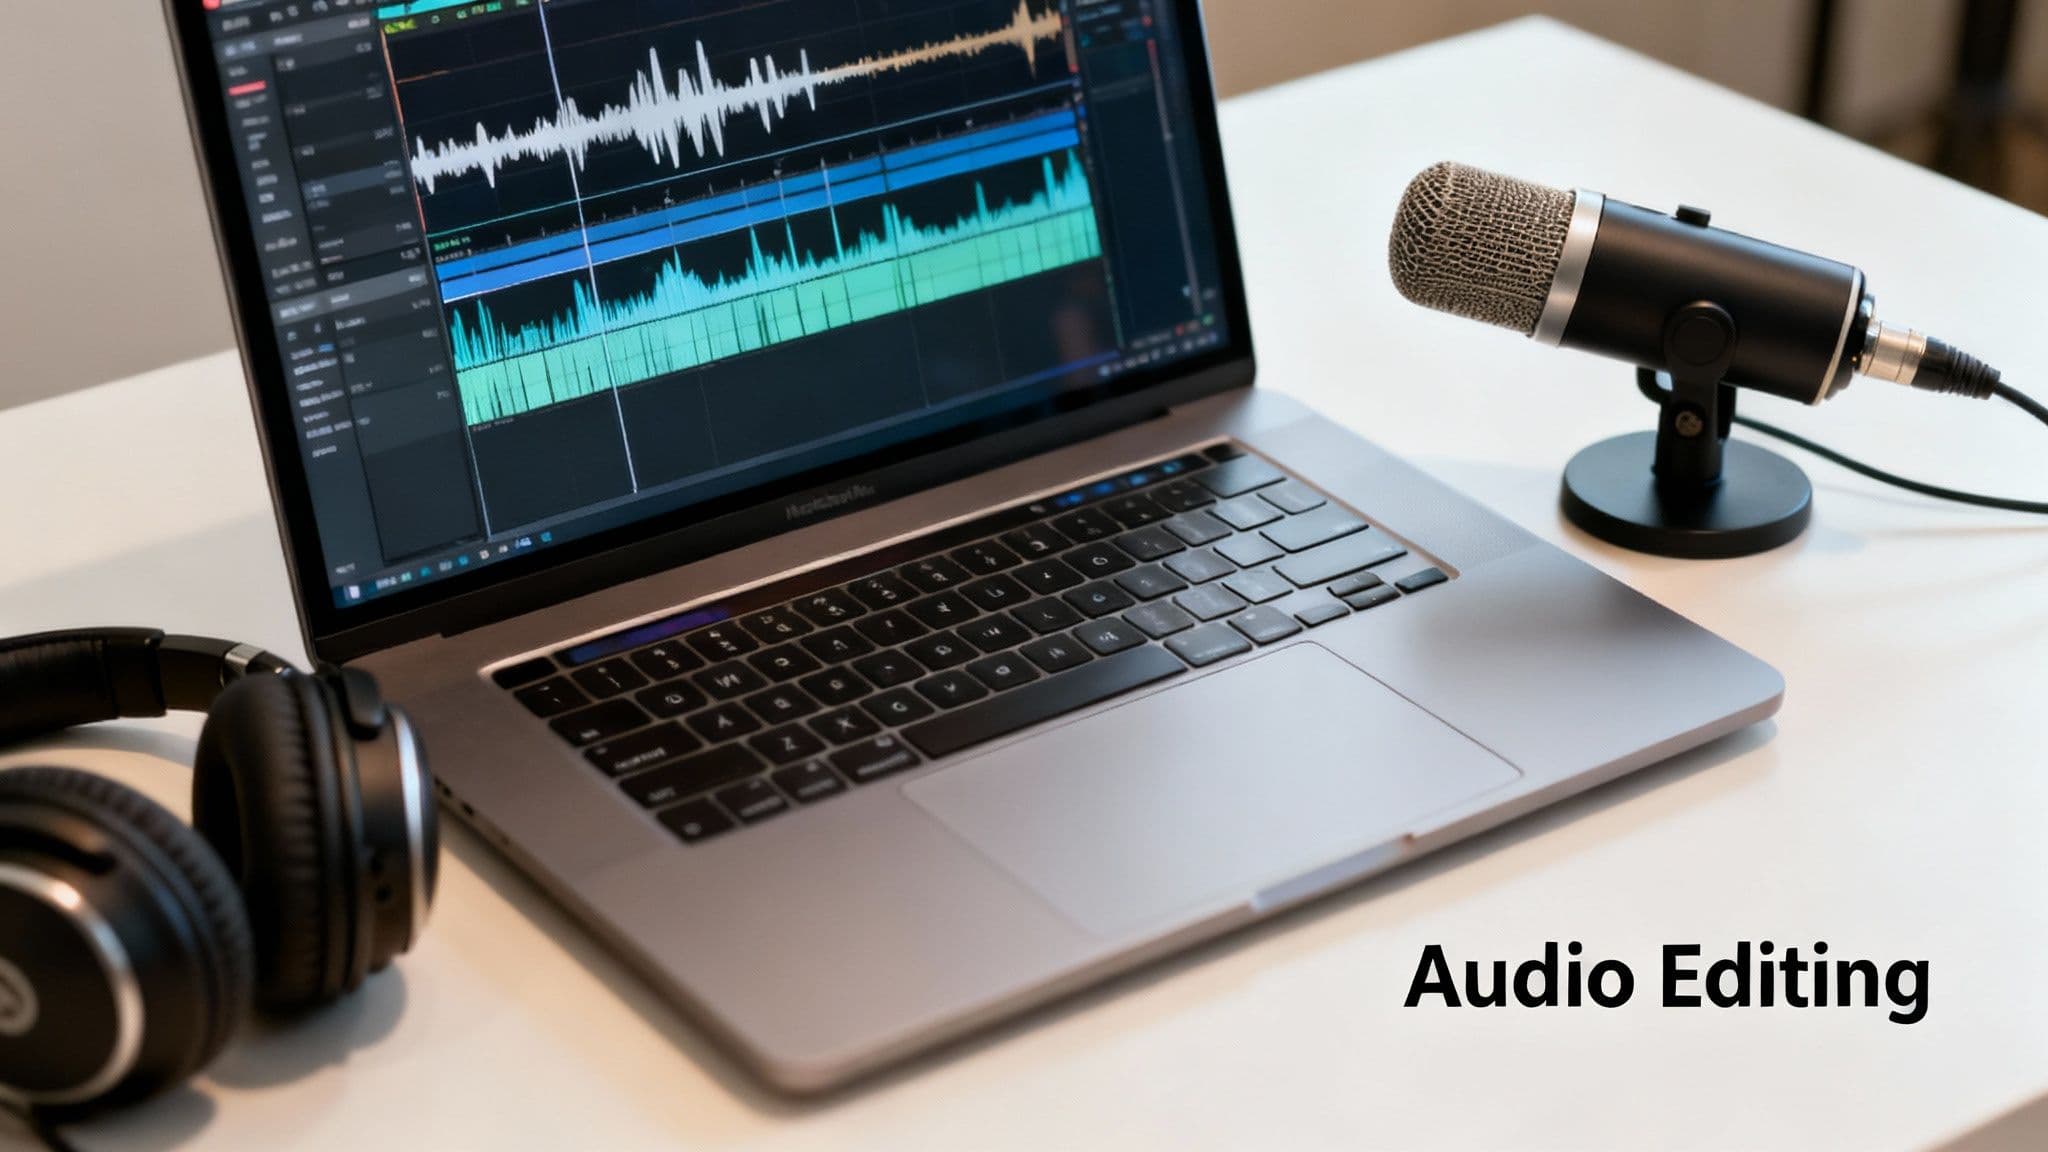
Clean, well-mixed audio makes your content easier to understand and more enjoyable to watch, holding your audience's attention for longer. Think about a gaming stream where every sound cue is crisp or a podcast where the dialogue is smooth and clear. That's the power of good sound design. When recording, understanding microphone characteristics like the cardioid polar pattern can significantly improve your sound quality from the outset.
Here's how to get your audio right:
Tired of setting up the same titles, color grades, and effects from scratch for every single video? Let's talk about the ultimate workflow hack: creating and using templates and presets. This is one of the most powerful video editing tips for beginners because it saves an incredible amount of time and ensures your content has a consistent, professional look. Think of it as creating a "master recipe" for your video's style, which you can apply with just a few clicks. Whether it's for a YouTube intro or a corporate branding package, templates are your best friend for efficiency.
Templates eliminate repetitive tasks and enforce brand consistency, which is crucial for building a recognizable presence online. A wedding videographer might use preset color grades for a signature romantic look, while a podcaster can use an intro/outro template to standardize every episode. This approach lets you focus on the creative storytelling instead of the tedious setup.
Here’s how to master it:
| Item | 🔄 Implementation Complexity | 🧰⚡ Resource Requirements / Efficiency | 📊 Expected Outcomes | 💡 Ideal Use Cases | ⭐ Key Advantages |
| The J-Cut and L-Cut Editing Technique | Low–Medium; simple edit, needs audio timing | Minimal; standard NLE, no extra hardware | Smooth transitions, better continuity and pacing | Dialogue, vlogs, documentaries, music videos | Polished flow; reduces jarring cuts |
| Color Grading and Color Correction Basics | High; requires color theory and practice | Medium–High; grading software, calibrated monitor | Cohesive aesthetic, mood shaping, professional polish | Cinematic projects, branded content, music videos | Dramatic visual transformation; storytelling through color |
| Multi-Cam Editing Workflow | Medium–High; sync and organizational overhead | High; multiple camera files, storage, timecode/clapper | Dynamic multi-angle sequences, broadcast-style edits | Live events, interviews, concerts, multi-camera shoots | Efficient angle switching; professional visual variety |
| Keyboard Shortcuts and Custom Hotkeys | Low–Medium; learning curve for muscle memory | Low; keyboard only, optional macro tools — very cost-effective | Substantially faster edit times, fewer repetitive actions | High-volume editors, tight deadlines, daily workflows | Big speed gains; reduces physical strain |
| The 180-Degree Rule for Continuity Editing | Low; simple to follow but requires planning | Low; knowledge and on-set marking — no special gear | Maintains spatial clarity, prevents audience disorientation | Dialogue scenes, interviews, traditional dramas | Clear screen direction; easier audience comprehension |
| Organizing Project Files with Nested Bins and Sequences | Medium; setup and disciplined naming required | Low–Medium; time investment and storage management | Faster asset retrieval, smoother collaboration, scalable projects | Large productions, team workflows, long-term series | Saves time; improves collaboration and revision control |
| The Rough Cut to Fine Cut Editing Process | Medium; multi-phase workflow and review cycles | Medium; time and stakeholder feedback loops | Strong story structure, iterative improvements, polished final | Feature films, TV episodes, documentaries, client projects | Structured refinement; reduces late-stage rework |
| Pacing Through Cut Length and Rhythm | Medium; requires creative judgement and testing | Low; standard editing tools, reference material | Controls emotion and energy; impacts engagement and comprehension | Action sequences, music videos, vlogs, dramatic scenes | Shapes viewer emotion; creates visual rhythm |
| Audio Editing and Sound Design Fundamentals | Medium–High; technical audio skills and monitoring | Medium; good headphones/monitors, plugins, sometimes DAW | Big perceived quality improvement; supports storytelling | Podcasts, films, YouTube, trailers, gaming content | Raises perceived production value; can salvage footage |
| Creating and Using Templates and Presets | Medium; upfront design time and maintenance | Low–Medium; time to build, store, and update templates | Consistent branding, faster repeatable production | Channels, agencies, recurring client work, batch projects | Speeds workflow at scale; ensures consistency across projects |
And there you have it, the secret sauce is officially out of the bottle. You've just navigated a whirlwind tour of ten powerful video editing tips for beginners, moving far beyond simple cuts and transitions. We've demystified everything from the cinematic grace of J-cuts and L-cuts, which seamlessly blend your audio and visuals, to the disciplined art of the 180-degree rule that keeps your audience grounded in the scene.
Think of these tips not as a checklist to complete, but as a new set of creative tools in your digital workshop. Mastering the rough cut to fine cut workflow will transform your chaotic timelines into polished narratives, while organizing your project files with nested bins is the secret to staying sane on complex projects. Each tip is a stepping stone toward faster, smarter, and more impactful editing.
The gap between knowing and doing is where true growth happens. Don't let this be just another article you read. Pick one or two concepts to apply to your very next project.
Remember, the goal isn't just to assemble clips; it's to tell a story that resonates. It's about controlling the rhythm with your cut length, evoking a specific mood with color, and ensuring your message is crystal clear with clean audio. You now have the foundational knowledge to move from a beginner who simply uses software to a creator who crafts compelling visual experiences.
Creating a masterpiece is only half the battle. A perfectly edited video deserves an audience, and in the fast-paced world of social media, that means having a smart content strategy. This is where your editing skills meet data-driven insights. Understanding what's trending and how your content is performing is crucial for growth.
That’s precisely why pairing your newfound editing skills with an analytics tool is a game-changer. The Trendy app is designed for creators like you, helping you analyze your social media performance, discover viral trends, and understand the content that will connect with your audience. Don't let your hard work go unnoticed. Use Trendy to ensure your beautifully crafted videos get the reach and engagement they deserve, turning your editing efforts into tangible growth. Your journey from a novice editor to a savvy content creator starts now.
Ready to pair your killer editing skills with a powerful growth strategy? Download the Trendy app to get the insights you need to turn your polished videos into viral sensations and grow your audience faster than ever. Get started today at Trendy.
