
You've filmed the clip, found a look that seems perfect, and then discovered that the “filter” you wanted is an interactive effect that can't be added to finished footage. Or you've applied a dramatic color treatment, only to make your product look inaccurate and your text harder to read. Learning how to use TikTok filters starts with separating these two tools, then testing visual changes deliberately.
TikTok's native workflow is straightforward: open Add Post (+), choose Effects or Filters, preview and adjust the result, then record or publish. The creative advantage comes from knowing which tool fits the idea, when to apply it, and how to compare filtered footage with an unfiltered baseline.
Discovering TikTok Effects and Filters
The most important distinction is simple. Effects change or augment the scene, while Filters mainly change its visual treatment. An effect might attach an augmented-reality mask to a face, add an animated object, create an interactive scene, or track movement. A filter generally adjusts color, tone, contrast, or atmosphere without adding interactive elements.
Open TikTok's camera by tapping Add Post (+). For an effect, tap Effects at the bottom, browse or search the available options, preview one with your camera, and record once the scene behaves as expected. For a standard filter, tap Filters in the side panel, select a visual treatment, and use the slider to control its strength. TikTok's official filter workflow confirms that these tools belong to different parts of the camera experience.
Choose the tool that matches the concept
Use a filter when the content already works and needs a consistent visual finish. A cooking demonstration may need warmer color, while a product review may need restrained contrast so packaging remains accurate. Use an effect when the creative idea depends on tracking, animation, a prompt, an interactive reveal, or a scene transformation.
TikTok's creator ecosystem also supports custom effect publishing. The public beta of Effect House launched on April 12, 2022, allowing creators to build and publish effects rather than only use built-in options. In Effect House, creators can begin with templates or tutorials, add components such as eye, lip, eyelash, face-mask, or hair-segmentation effects, preview the result, and submit it for review. The Effect House filter component guide explains how creators can control visual properties instead of treating a filter as a simple switch.
If you're organizing a larger content operation, Trendy's apps can sit alongside TikTok's native tools as part of a broader planning workflow. For creators who need specialized experiences outside ordinary in-app presets, custom content filters can also be useful when the visual treatment needs to serve a defined campaign or brand system.
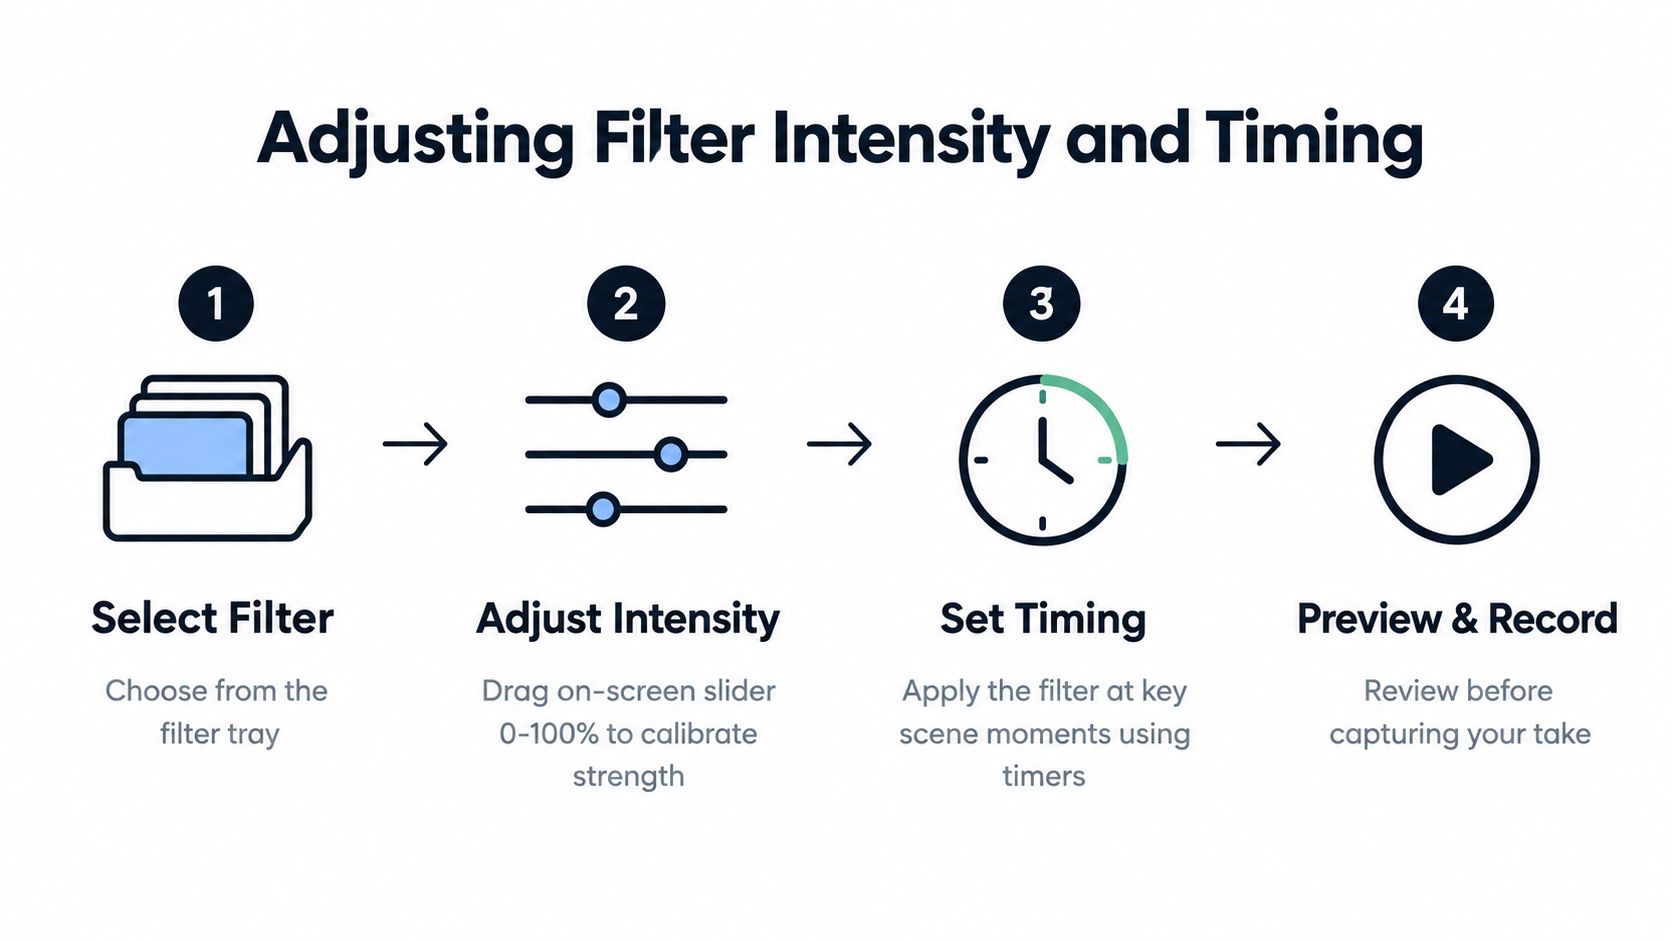
Adjusting Filter Intensity and Timing
A filter's default setting is a starting point, not a creative decision. Select a filter, preview your face, background, text, and products, then drag the on-screen slider until the treatment supports the subject instead of competing with it. Stronger intensity can create a recognizable mood, but it can also shift skin tones, change product colors, reduce detail, and make captions less legible.
TikTok's Effect House filter component uses an intensity scale from 0 to 1, where 0.00 means no filter and 1.00 means full intensity. The component also supports adjustments for exposure, contrast, brightness, saturation, temperature, and tint, which gives creators more control than an on or off choice. Those controls are especially useful when a brand needs a repeatable look across different filming conditions.
Apply the treatment at the right point
You can apply a standard filter before recording, which lets you judge the look while framing the shot. TikTok also allows filters to be applied or adjusted after you've recorded or uploaded footage. That gives you room to create several visual versions from the same source clip instead of reshooting whenever the color treatment feels wrong. TikTok's official effects guidance covers this native editing path.
Use the pre-recording option when the look affects your performance, lighting decisions, or composition. Use post-recording adjustment when you want to compare finishes without changing the camera work. Always preview the final result under the lighting and framing you'll use for publication, then check the uploaded video as well. Compression and screen differences can make a subtle treatment look harsher after publishing.
Keep a short production note with the filter name, intensity, lighting conditions, camera distance, and application point. That record makes successful formats easier to repeat and prevents you from mistaking a lighting change for a filter improvement. For planning ideas around that production system, the Trendy blog provides a broader content resource.
Running Effective A/B Filter Tests
A filter test only tells you something useful when the filter is the main variable that changes. If you alter the lighting, opening line, camera distance, framing, sound, and caption at the same time, you won't know what caused a different response. The cleanest method starts with one finished, unfiltered baseline.
Record and save the original clip before adding a visual treatment. Create a filtered version from that same footage, keeping the opening, edit points, audio, caption treatment, and cover approach consistent. Then compare the two files side by side before publishing.
Inspect the viewer's experience first
Start with visual checks rather than assuming a stronger look will win. Review:
- Skin tones: Do faces still look natural under the intended lighting?
- Product color: Does packaging, clothing, makeup, or food retain its recognizable appearance?
- Text contrast: Can viewers read captions against the treated background?
- Subject separation: Does the person or object stand out clearly?
- Detail retention: Does the filter flatten texture or hide important features?
- Brand fit: Does the mood match the account's established visual identity?
A filter can improve the first impression while weakening the information a viewer needs. A beauty creator may benefit from a softer finish in a casual tutorial, but the same treatment can undermine a skincare demonstration if it hides texture. A retailer may prefer a restrained look because color accuracy matters more than atmosphere.
Practical rule: Test the filter against the job of the video, not against an abstract idea of what looks attractive.
Once both versions pass the visual check, publish them as controlled tests when your content plan allows. Keep the topic, format, hook, posting context, and audience target as comparable as possible. Examine the signals available in your analytics, including whether viewers continue watching, interact, save, share, or comment. Don't claim that a filter caused an improvement from a single comparison. Treat the result as a working hypothesis, then repeat the test on another comparable format.
A useful A B testing for marketing guide can help formalize the discipline behind controlled comparisons. The practical payoff is a documented visual system: filters that support your niche stay in rotation, while treatments that damage clarity or audience response disappear from the workflow.
Integrating Filters into Your Content Strategy
A filter shouldn't lead your content strategy. The audience problem, trend, format, and message come first. The visual treatment should help the viewer understand the post faster, recognize the account, or feel the intended mood without distracting from the reason to watch.
That's where a cross-format workflow becomes useful. Start with a Profile Audit to identify the topics, formats, and visual patterns already associated with the account. Move into Trends & Ideas to find relevant sounds, hashtags, prompts, and video structures. Build the post with a ready-to-shoot script, hook, scene structure, or visual concept. Finish with Performance Analysis to see whether the treatment supported the content's purpose.
Match the visual choice to the format
A talking-head explanation usually benefits from clear facial visibility and readable captions. A trend-led reaction may justify an interactive effect because participation is part of the idea. A product demonstration needs color fidelity and detail. A lifestyle montage may tolerate a stronger mood treatment if the visual atmosphere matters more than precise representation.
Trendy works as an AI-powered social media co-pilot across TikTok and Instagram, with support for planning formats such as ready-to-shoot video scripts, hooks, scene structures, carousels, visual post concepts, LinkedIn posts, and Threads/X posts. Its workflow connects profile analysis, trend discovery, content creation, and performance review, so a filter choice can be evaluated as part of a repeatable publishing system rather than selected in isolation.
Cross-platform reuse needs a deliberate edit. Instagram Reels support videos up to 3 minutes, and creators can use one continuous clip or multiple clips whose combined duration stays within that limit, according to Instagram's Reels feature information. A TikTok concept built around a live AR effect may not transfer cleanly to an uploaded Reel, while a color treatment and scene structure may adapt easily. Keep the original footage, script, captions, and clean baseline so each platform can receive the version that fits its tools.
For brands selling through short-form content, a focused resource on TikTok growth for e-commerce brands can complement this production thinking. Agencies and independent strategists can also explore the Trendy partner program when building repeatable content workflows for multiple accounts.
Balancing Enhancement with Audience Trust
A polished video earns attention only if viewers can still trust what they're seeing. That matters most for testimonials, tutorials, product demonstrations, skincare content, fitness advice, and any post where appearance or results influence a decision. Face-shaping effects and heavy beauty treatments may make a creator feel camera-ready, but they can also hide the very details the audience needs to evaluate.
Use visual enhancement to support communication, not to manufacture evidence. If a substantial alteration changes how a person, product, or result appears, disclose it when that difference affects interpretation. A clear note is more credible than allowing viewers to assume that an altered image represents an unedited result.
Build an authenticity check into production
Preview the video under different lighting conditions and on more than one screen when possible. Check faces with different skin tones, product colors, small text, and backgrounds with fine detail. If an effect reduces facial visibility or makes speech harder to follow, provide an unfiltered or captioned alternative.
Responsible use also means separating creative filters from safety and moderation tools. TikTok supports keyword filtering in supported feeds and comment controls that can screen offensive or previously reported comments. Those features solve a different problem from visual color treatment, so don't present every TikTok filtering feature as a reach tactic.
The wellbeing question deserves equal attention. Exposure to edited or filtered content has been linked in emerging research with body dissatisfaction, body surveillance, and upward social comparison, particularly among adolescents and young adults. That doesn't mean creators must remove every creative treatment. It does mean that face alteration deserves more care than a mild color adjustment, especially when the post presents itself as a realistic testimonial.
Trust grows when the visual treatment is obvious, purposeful, and appropriate to the claim.
Documenting your production choices also supports responsible collaboration. If a team member needs to review how a post was created, the filter, intensity, lighting, and capture stage should be clear. Keep account and workflow data handled responsibly, and review Trendy's privacy policy before connecting services or organizing a multi-account process.
Next Steps and Essential Resources
A reliable filter workflow starts with one repeatable format, not a different treatment on every post. Save a clean baseline, then apply either a standard filter for color or an effect for tracking, interaction, or scene changes. That distinction matters because Effects can alter how the camera responds, while Filters primarily change the image's visual treatment.
Run a controlled comparison before committing. Keep the script, opening, framing, lighting, posting time, and caption consistent. Change only the filter or effect, then compare retention, engagement, clarity, text readability, color, and subject separation. Record the intensity, timing, lighting, and application stage so the winning version can be repeated and reviewed against later posts.
AR effects require additional technical checks. Test one and multiple subjects, partial occlusion, varied face angles, skin tones, low light, motion, glasses, and hats. Face-attached assets follow detected faces in order, with the first assigned index 0, the second index 1, and so on. Avoid stacking segmentation with too many tracking algorithms, including Face Inset and Head Tracker, because stability and responsiveness can decline.
For scripts, hooks, trend ideas, calendars, and performance reviews, download Trendy for iOS or Trendy for Android. Use the Trendy web app, then review Trendy pricing options for a suitable publishing workflow. Trendy also supports profile audits, trend discovery, cross-platform planning, and performance analysis.